Yoga Pose: Warrior 2

warrior-2-yoga-pose.jpg

Warrior 2 – virabhadrasana 2 – is one of my all-time favorite Yoga poses. It makes me feel grounded, strong and at ease all at the same time. This pose works well to strengthen and stretch the legs, groins, feet, and ankles, and of all the Warriors, it is probably the one that is most easily accessible to the most amount of people – and in case you didn’t know - that is very important to me when putting a tutorial up on the blog! Keep reading to find out how to move into this posture and be sure to check out the handy visual at the end! 

Difficulty Level: Beginner

Step one: Standing in tadasana facing the long end of your mat, take a nice wide step with your feet, so they are about 4 or so feet away from each other. Make sure that the baby toe sides of your feet are parallel with the short end of the mat – toe’s point straight ahead. 

Step two: Turn the Right Foot out 90 degrees so the toes point toward the short end of the mat. 

Step Three: With an inhale, raise your straight arms up to shoulder height, stretching through the finger tips – nice, strong warrior arms! 

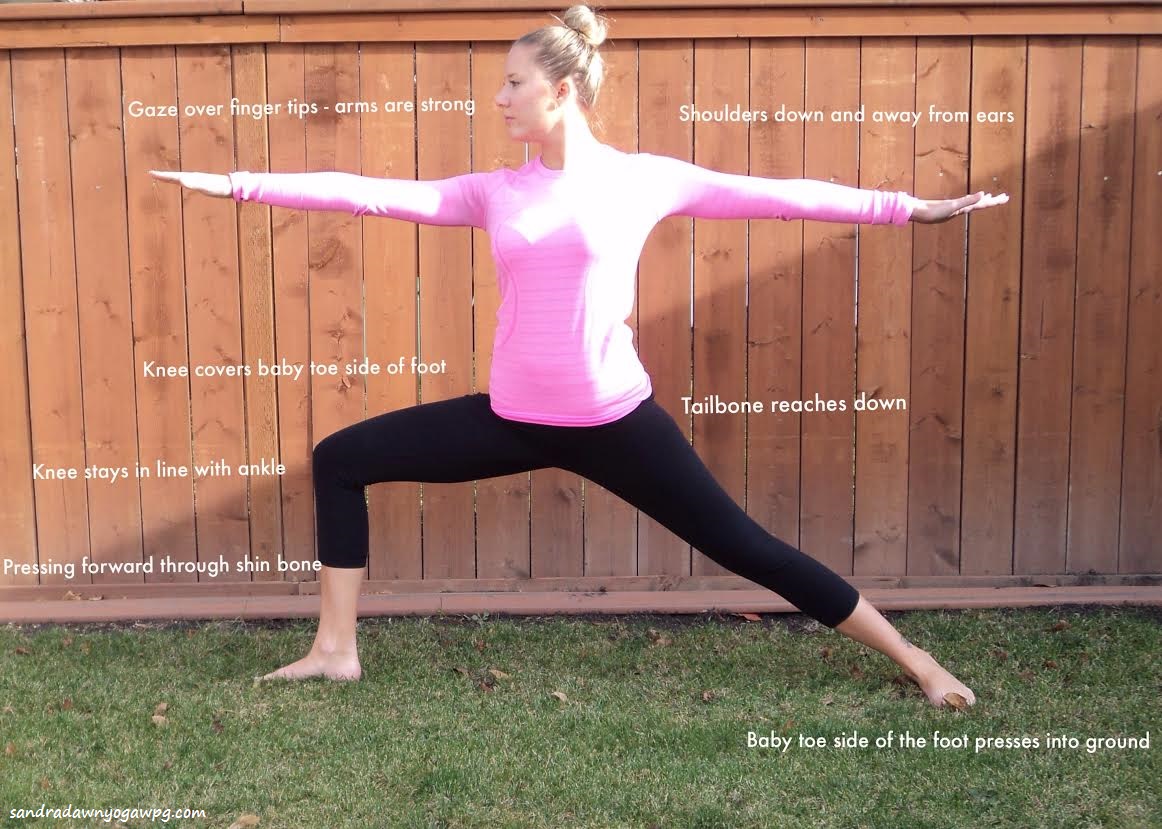
Step Four: With an exhale, bend deeply into the Right knee, being conscious to keep the knee in line with the ankle and not coming past the ankle. Also, notice if the knee covers the baby toe side of the foot or the big toe side of the foot when you look down. You want to try and have it cover the baby toe side of the foot so the knee isn’t collapsing inward. 

Step Five: Breathe – Try staying here for 5 -10 full body breaths

Gaze gently over the Right finger tips – This is your Drishti 

Release the shoulders down away from the ears.

Press into the outer edge of the back foot to activate the back leg and keep it from collapsing 

Move forward through the shin bone of the bent leg

Sit lower through the hips, lengthening the tailbone down toward the ground

Step six: With an inhale, straighten the Right leg. Bring the hands to your hips and turn the Right toes to face the same direction as the Left and then heel/toe the feet toward one another to come back to standing. 

Repeat on the other side!

Namaste :)

Real Life: What it takes to Follow your Dreams

I took this selfie right before going to get photos for my website - My first step toward following my dream.... I had no idea what I was in for ;)

I took this selfie right before going to get photos for my website - My first step toward following my dream.... I had no idea what I was in for ;)

The Dream – my dream – is to transition from my current career into a full time Yoga teaching gig and  start my own Yoga program. A bit of background on that dream… I have been teaching part time, a couple classes a week, for a few years now after getting my 200 hour certification in 2012, and I love it! Now, that’s not to say that every day that I teach I am feeling the same level of passion or inspiration – this is real life - however, the way that teaching, practising, and taking Yoga off my mat makes me feel has shown me that this is something I want more of. When I look forward 10 years, I see my life as a Yoga teacher, creating classes and workshops, building community and moving my body every day as part of my career. So how do I get there? Some social media, books, articles etc. would have you believe that it is as easy as visualizing the goal, quitting your job, making the leap, and riding off in to the sunset. Well, in my experience, in real life it takes a lot more work. Continue reading to see just some of what it takes to follow your dreams - in real life. 

It takes… Planning, baby steps, and safety nets. 

It takes… Long and longer days of work at your day job so you can bank the time you need to take off to teach, because this is real life and in real life you have real bills. 

It takes… Learning as you go and not having a hot clue what you’re doing for a while. (But then you figure out how to get that pay pal button set up on the webpage and you feel like you could conquer the world!)

It takes… Computer skills.

It takes… Hitting the pavement with the flyers you spent hours formatting so that you can promote your classes.

It takes… Networking skills. 

It takes… Signatures on rental contracts before having enough people signed up for your classes to even cover the cost of rent. 

It takes… Feeling like you are failing, a lot, and not letting that discourage or disappoint you. (Edit: This is real life – in real life we get discouraged and disappointed, so it’s about feeling that and moving forward anyways)

It takes… Amazing support from your loved ones, especially when you want to quit and they won’t let you. 

It takes… Being vulnerable and sharing your deepest wants, passions, fears, and failures with others, because this is real life and in real life we fail some, we want a lot, and we must go after what we are passionate about. 

It takes… Guts. Courage. Cojones. Whatever you call it, it takes a lot of it. 

In the end, (or should I say beginning - because that is where I am), it’s worth it. You can look at what you have done and are doing and feel really accomplished. You can redefine success in your own terms and no matter what the outcome is, you can always look back and say you tried your best, because this is real life, and in real life that’s all anyone can do.

3 things to Expect from an Alignment Focused Beginner Yoga Class

Photo found on http://www.dailyyogareflections.com/

Photo found on http://www.dailyyogareflections.com/

If you have never taken a Yoga class before, it is likely you may feel a bit anxious wondering what is in store for you. Keep reading to learn three things you can expect from the alignment focused beginner yoga class that I teach.

1. Demonstration and Instruction: In the alignment focused beginner classes that I teach, I always demonstrate a pose before the group moves into it. This way, the participant has both visual and verbal cues to work off of when moving into a pose for the first time. It also helps decrease the awful craning of the neck that often happens when you are trying to move into a pose and watch the instructor at the same time.  

2. Props and Modifications: No two people are the same and no two bodies are the same. It is not realistic to think that everyone will be able to access a pose in the same way. Since people vary in their level of flexibility, strength, and activity level – especially in a beginner class – I feel it is important to provide modifications of the poses that will work for everyone. For example, if you can’t touch the toes I would give you a Yoga Block to press your hands in to. Or, when learning triangle pose, it often takes people out of alignment to try and place their hand on the floor, so instead, use a block to support the hand. 

Yoga Block Photo found on http://yogauthority.org/

Yoga Block Photo found on http://yogauthority.org/

3. Slower pace: As opposed to a flow style class, where you move from pose to pose without a break in between, the alignment focused beginner class is a slower pace. Each pose is broken down, demonstrated, and practiced. There is time for questions, time to find the correct alignment or modification for the pose, and most importantly, time to feel your body and breath in each pose.

If you or someone you know would benefit from an alignment focused beginner class – there is only one week left to sign up! For more information visit the Your Best Yoga page here. 

If you have any questions or concerns about signing up, please contact me directly at sandrayogawpg@gmail.com

Namaste :) 

When I am Doing my Best... with the creator of Mieroglyphs!

Something you may not know about me? I love quotes. Like, LOVE them. I have them posted on my corkboard in my office at work to inspire me throughout the day. The lock screen on my phone will display one I need to see on a regular basis – it’s currently the “our deepest fear” quote from Marianne Williamson. I have the word “Trust” tattooed on my ankle as a reminder to “trust the journey”. Basically, for me, when I am looking to be inspired/motivated/encouraged/lifted up or validated… I’m turning to words. 

I’m also a fan of bracelets. 

Think those two things don’t go together at all? Think again!

Mieroglyphs (like Hieroglyphs but with an "M") is a company started by Tyson Auer, who also finds inspiration from quotes. His company makes bracelets, which he then engraves by hand (seriously, I double checked and asked him if he REALLY does this himself by hand and he said he does) with the customers favorite and customized quote. The quotes are actually engraved on the INSIDE of the bracelet, so you can walk around completely inspired by something that no one else even needs to know about! Their tagline is “it’s what’s on the inside that counts” which I find quite charming and very fitting for their product. They also refer to the “Miero” as your own hidden tattoo – but you know, way less permanent ;). Check out their company vision here for more details on the bracelets. 

Photos from mieroglyphs.com

Photos from mieroglyphs.com

Naturally, I wanted to know what it looks like for Tyson when he is doing his best – and engraving bracelets by hand – and this is what he had to share:

“To me doing my best can probably be summed up by my favorite quote – “stay hungry, stay foolish”. As long as I follow these words I am always staying hungry to better myself and my surroundings and by staying foolish I am always following my heart. It’s the quote I wear inside my Miero.” 

I’m currently teaming up with Mieroglyphs to spread the word on their products AND if you want to get your very own Miero, you will get FREE SHIPPING on your orders with the coupon code SANDRAYOGA. That may not seem like a big deal, but when I ordered my bracelet, shipping was $10.00 so that’s a pretty good saving! I ordered the Aztec bracelet and have it engraved with “just do your best”.

Visit their page here: http://www.mieroglyphs.com/

As always, I would love to know what it looks like when you do your best and if you leave a comment before Oct. 31 you will be entered to win passes to the “Go with the Flow” class for you and a friend in November! 

* Disclosure: I am involved with Mieroglyphs Affiliate Program

Yoga Pose: Cat & Cow with Variations

If you come to a class with me, whether it is a flow style or a beginner alignment focused class, there is a VERY good chance that we will do cat/cow stretches while we warm up and wake up all the muscles that may have become stagnant through the day. I am such a fan of this stretch! It feels amazing after a day of sitting at a desk, it stretches open the front and back body, and it provides a great opportunity to begin coordinating the movement of your body with your breath. I also love that from this simple stretch, I can add a number of variations based on the theme or style of the class I am teaching. Keep reading to find out how to move into Cat and Cow and a couple of it's variations. Be sure to check out the video at the end for some visual cues! (Note: This was my first attempt at a Yoga Tutorial video... so be kind ;))

Difficulty: Beginner*

*Note: Some of the variations may be slightly more challenging for a beginner - if you are unsure about them, give them a try and just do your best! 

If you experience pain in your knees when in table top, you may benefit from a thick mat - I like this one (links to Amazon US).

Here is the link for my fellow Canadians! This thick mat really saves the knees.

Step One: Begin in a table top position, keeping a neutral spine, with wrists lined up under shoulders and knees lined up under the hips. The tops of the feet can rest on the mat. Take a deep, full body inhale. 

Step Two: As you exhale, begin to curl the spine up towards the sky - creating a rounded spine. As you round through the spine, allow the tail-bone to release down toward the mat and round the shoulders, releasing the head slightly toward the floor. This is cat spine.

Step Three: As you take your next deep inhale, release your belly toward the floor. As the belly releases toward the floor the tail-bone reaches up to the ceiling and your collar bones lift up, shifting your gaze upward. This is cow spine.

Step Four: Breathe and Stretch

Continue moving through these two poses, stretching through the front and back body, as you continue to breathe. 

As an Amazon Associate I earn on qualifying purchases.

NOTE: if you have knee problems, you can do these two spinal motions while sitting on the floor or on a chair. You may also find it helpful to place a blanket under the knees during this whole sequence.

Variations:

Balancing Cat: Bringing the spine back to a neutral position, engage through the core and hug the belly up toward the spine. Stretch the right leg back behind you, pressing through the heel of the foot, keeping the leg in line with the body - not lifting high or drooping too low. As you find your balance extend the left arm out, keeping it in the same line as the body, extending through the finger tips. Breathe here as you balance. 

Balancing Cat Pulling it's tail ;): From Balancing Cat, keeping the leg lifted, begin to bend the knee, bringing the foot up toward the sky. Turn the arm so the palm faces out and the thumb is pointing down toward the ground. Sweep the arm back to catch the foot. Press the foot back into the hand, so you feel the stretch in the front of the thigh and the arm stays extended. Feel the stretch through the front of the chest as the arm stretches back. Turn your gaze upward if it feels ok on your neck. 

Namaste! 

If you or someone you know finds these tutorials helpful, you will probably love the Your Best Yoga Beginner Class - Register now! :)