yoga props

Your Best Yoga Manifesto: Props are Helpers not Hinderer's

Photo found here

Photo found here

When I decided that I wanted to start my own Yoga program, it wasn't just because I wanted to teach more. It was because I wanted to create a space and program that I could infuse with my own thoughts and values about practising Yoga. I feel like my manifesto for the Your Best Yoga program touches on each of the values that I hope to bring to the program and I want to spend some time "breaking down" each line of it for better understanding. Today we are at line 6 of the Manifesto - if you need to catch up here's part 1, part 2, part 3, and part 4

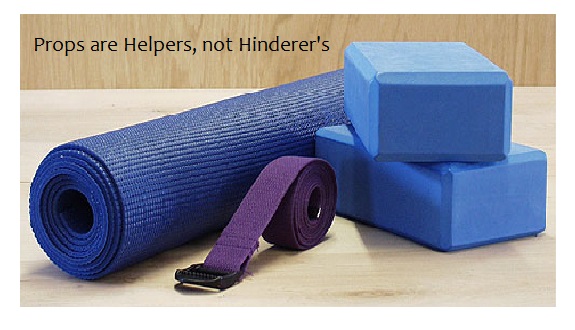
In my day (ie: non-Yoga)  job we talk about adapting the environment to be a good fit for a person – for example you don’t expect a person in a wheelchair to navigate stairs, you build a ramp. I’d like to think that Yoga props are the environmental adaptation that some people need in order to enjoy a safe and effective practice. When I first started practising yoga I was attending studios that didn’t use or feature Yoga props prominently, so when I was first introduced to props I admittedly was a bit hesitant to use them. I wasn’t sure how to use them or really what they were for. Since learning how props can help support the body and provide access to correct alignment for people I would definitely consider myself a prop enthusiast, however, there are some people who still hesitate to use props as they feel like they are used as a “crutch” instead of a helper. In my experience, this doesn’t have to be the case. 

When I am teaching a beginner class, if props are available, I will almost always show the pose using the prop. Why? Because props allow people to access poses in a safe and correct way that they may not be able to otherwise. I have seen many a collapsing Triangle pose, where the persons chest is facing the floor and they are trying to get their hand to the ground. By providing the block under their hand they are able to find the opening in the chest, keep the working in the legs and actually hold the shape of the pose for a few breaths. You aren’t losing out on anything or weakening your practice by using the prop, quite the opposite really. Correct alignment that allows you to open the body and access the breath is more important than “deeper” incorrect stretching, in my opinion. So I will always show the beginner Yogi how to use props, and hopefully the more they practice and the more open their body becomes, the less they may need the props – Virasana is a great example of this as people often start sitting on a high support when they’re quads are very tight and eventually they can sit on a small height or none at all as they lengthen their muscles. Alternatively, if the challenge in a pose is due to something like body proportion, they may always have to use a prop, which should certainly not be considered a hindrance or crutch. 

Tell me, are you team "Yoga Props" or do you prefer not to use them in your practice??

Yoga Props: How to Make Your own Yoga Bolster - No Sewing Required!

Yoga Bolsters are one of my favourite Yoga Props to use. When I arrive to a class and the teacher asks us to get a bolster, I know some lovely restorative poses are coming up and I'm about to feel realllllyyyy relaxed ;) Yoga Bolsters can range in price and quality of course, so I wanted to try my hand at making my own before investing my dollars in a more pricey one ($60 - $100). This home-made bolster cost me about $25.00 to make in total, and I'm actually quite impressed with how it turned out. It's firm, but not hard, and it's a good length and depth for my body shape. The entire process took me less than an hour - and that included a small crisis with the liquid stitch, which I ended up throwing away and not using at all. Keep reading to find out how you can make your very own Yoga Bolster - no sewing required! 

What You Will Need: 

IGNORE THE LIQUID STITCH! :) 

IGNORE THE LIQUID STITCH! :) 

1 Foam Pool Noodle - $1.00 at Dollarama

1 Flannelette* Pillow Case - Free, as I used an extra one I had at home 

1 Bag of Cotton Batting

1 Package of Adhesive Velcro - $1.50 each (I bought two to be safe)

Packing Tape

Scissors

Sharpie marker

Measuring Tape

*You can use a cotton or other type of pillow case if that's what you have. 

Step 1: 

Measure the pool noodle and mark it with the sharpie in the middle. Fold the noodle in half and use scissors to cut it. You want your two pieces to be as equal in length as possible. Use your packing tape to secure the two pieces together side by side. 

Step 2: 

Take your cotton batting out the bag and fold it in half once so you have a double layer. Place the pool noodles on the far end of one side (not like in the picture) and roll them up in the blanket. 

Step 3: 

Secure the cotton with packing tape. 

(I also placed a long strip of tape over the rough edge of cotton so it was smooth - sorry for the lack of photo)

Step 4:

Place your bolster in the pillow case, making sure you push it all the way into one corner of the case. 

Pull the fabric tight around the bolster and cut the pillow case, leaving enough room to add the velcro to attach the pillow case together. Put the piece of pillow case that you cut off aside as we will use it later. 

Step 5: 

Press the adhesive velcro strip on to the outside  piece first, then pull it tight and mark where your attaching piece of velcro needs to go. You want the material to stay in place once velcro-ed. 

Step 6: 

Use the piece of pillow case that you cut off and place it over the bolster so that one corder of the bolster is in the one corner of the pillowcase. Once again, pull the fabric tightly and make your cut. 

Step 7: 

Back of bolster

Back of bolster

I was able to simply tuck the fabric in to the velcro-ed piece and because it was flannelette, it stayed in place. You can always use adhesive velcro on this part as well if you use another type of pillow case. 

And here is the finished product!!!! 

It's really quite simple - I literally made this process up as I went along, which is why some of the photo's are missing details - and took less than an hour to complete. You can make a variety of changes to make this bolster suit your needs - add another piece of pool noodle to make it wider, wrap an old towel around the pool noodles before you roll it in the cotton batting to make it thicker etc. 

Check back in a couple weeks to see some of my favourite restorative poses to do with this Yoga Prop. I'd also LOVE to know if you make one of these yourself, so be sure to let me know by leaving a comment below, sending me your pictures or tagging me in them on Instagram @sandrayogawpg.

Check out Yoga Design Lab for some premade yoga props and be sure to look at their infinity and curve mats, specifically made for taller yogi’s!

As a Yoga Design lab affiliate I earn a commission on eligible sales.